OpenClaw - I'm (not) scared...

TL;DR:
- OpenClaw tested in an isolated Ubuntu VM on Proxmox
- Local LLM (LMStudio on MacBook Air and Windows PC) connected via API
- WhatsApp bot successfully running
- Don't use Signal it doesn't support bots and you need a free phone number
- I didn't manage to get it working with a free GitHub account
- Full story with pitfalls, tips, and step-by-step setup below
You’ve probably already heard about the new and rather powerful AI agent called OpenClaw. And yes — it’s capable of a lot. But it can also be quite dangerous.
Why is that?
Well, OpenClaw is able to download and execute additional software, which naturally makes it a potential target for attacks. That’s why I strongly recommend testing it only inside a freshly deployed and fully isolated virtual machine — and definitely without root privileges.
So that’s exactly what I decided to do this evening.
At the same time, I wanted to take the opportunity to use some of my recently created OpenTofu projects. Of course, if you already have an Ubuntu VM running, you can skip that part entirely.
I deployed everything on my good old Proxmox server, inside an Ubuntu 24.04 virtual machine. The first step was creating an Ubuntu template in Proxmox:
git clone https://github.com/r0k5t4r/tf-proxmox-template-creator.git
cd tf-proxmox-template-creator
tofu init
tofu plan \
  -var-file=images/ubuntu_2404.tfvars \
  -state=ubuntu_2404.tfstate \
  --lock=false
tofu apply \
  -var-file=images/ubuntu_2404.tfvars \
  -state=ubuntu_2404.tfstate \
  --lock=false
With that, the template was ready — and in the next step, we could directly clone a virtual machine from it.
For this, I used another one of my OpenTofu scripts to automate the deployment process.
git clone https://github.com/r0k5t4r/tf-proxmox-multi-vms.git
cd tf-proxmox-multi-vms.git
cp environments/docker.tfvars environments/openclaw.tfvars
tofu plan \
  -var-file=environments/openclaw.tfvars \
  -state=openclaw.tfstate \
  --lock=false
tofu apply \
  -var-file=environments/openclaw.tfvars \
  -state=openclaw.tfstate \
  --lock=false
After a few seconds our VM is ready and we can log in via SSH.
ssh ubuntu@192.168.2.120To further restrict the bot, I’m running it inside the VM under a dedicated local user account instead of as root.
Any use of sudo requires a password, adding an additional layer of protection and ensuring that privilege escalation cannot happen silently.
ubuntu@openclaw:~$ sudo cat /etc/sudoers.d/90-cloud-init-users
# Created by cloud-init v. 24.4.1-0ubuntu0~24.04.1 on Tue, 10 Feb 2026 20:59:50 +0000

# User rules for ubuntu
ubuntu ALL=(ALL) ALL
Next, we run the simple install script.
curl -fsSL https://openclaw.ai/install.sh | bashYes, Docker also works in case you were wondering.
🦞 OpenClaw installed successfully (2026.2.9)!
The lobster has landed. Your terminal will never be the same.

Starting setup...


🦞 OpenClaw 2026.2.9 (33c75cb) — I'm not magic—I'm just extremely persistent with retries and coping strategies.

▄▄▄▄▄▄▄▄▄▄▄▄▄▄▄▄▄▄▄▄▄▄▄▄▄▄▄▄▄▄▄▄▄▄▄▄▄▄▄▄▄▄▄▄▄▄▄▄▄▄▄▄
██░▄▄▄░██░▄▄░██░▄▄▄██░▀██░██░▄▄▀██░████░▄▄▀██░███░██
██░███░██░▀▀░██░▄▄▄██░█░█░██░█████░████░▀▀░██░█░█░██
██░▀▀▀░██░█████░▀▀▀██░██▄░██░▀▀▄██░▀▀░█░██░██▄▀▄▀▄██
▀▀▀▀▀▀▀▀▀▀▀▀▀▀▀▀▀▀▀▀▀▀▀▀▀▀▀▀▀▀▀▀▀▀▀▀▀▀▀▀▀▀▀▀▀▀▀▀▀▀▀▀
                  🦞 OPENCLAW 🦞

┌  OpenClaw onboarding
│
◇  Security ──────────────────────────────────────────────────────────────────────────────╮
│                                                                                         │
│  Security warning — please read.                                                        │
│                                                                                         │
│  OpenClaw is a hobby project and still in beta. Expect sharp edges.                     │
│  This bot can read files and run actions if tools are enabled.                          │
│  A bad prompt can trick it into doing unsafe things.                                    │
│                                                                                         │
│  If you’re not comfortable with basic security and access control, don’t run OpenClaw.  │
│  Ask someone experienced to help before enabling tools or exposing it to the internet.  │
│                                                                                         │
│  Recommended baseline:                                                                  │
│  - Pairing/allowlists + mention gating.                                                 │
│  - Sandbox + least-privilege tools.                                                     │
│  - Keep secrets out of the agent’s reachable filesystem.                                │
│  - Use the strongest available model for any bot with tools or untrusted inboxes.       │
│                                                                                         │
│  Run regularly:                                                                         │
│  openclaw security audit --deep                                                         │
│  openclaw security audit --fix                                                          │
│                                                                                         │
│  Must read: https://docs.openclaw.ai/gateway/security                                   │
│                                                                                         │
├─────────────────────────────────────────────────────────────────────────────────────────╯
│
◆  I understand this is powerful and inherently risky. Continue?
│  ○ Yes / ● No
Skynet is ready to take over the world.
Should we really allow this?
Feeling brave, I select “Yes” and press Enter.
For the initial setup, I go with the Quickstart option — I want to get things up and running as fast as possible.
At the moment, I don’t have an active AI subscription. However, I decide to select GitHub Copilot since I do have a GitHub account and occasionally use Copilot in VS Code.
It seems like the most convenient starting point.
◇  Onboarding mode
│  QuickStart
│
◇  QuickStart ─────────────────────────╮
│                                      │
│  Gateway port: 18789                 │
│  Gateway bind: Loopback (127.0.0.1)  │
│  Gateway auth: Token (default)       │
│  Tailscale exposure: Off             │
│  Direct to chat channels.            │
│                                      │
├──────────────────────────────────────╯
│
◆  Model/auth provider
│  ○ OpenAI
│  ○ Anthropic
│  ○ MiniMax
│  ○ Moonshot AI (Kimi K2.5)
│  ○ Google
│  ○ xAI (Grok)
│  ○ OpenRouter
│  ○ Qwen
│  ○ Z.AI (GLM 4.7)
│  ○ Qianfan
│  ● Copilot (GitHub + local proxy)
│  ○ Vercel AI Gateway
│  ○ OpenCode Zen
│  ○ Xiaomi
│  ○ Synthetic
│  ○ Venice AI
│  ○ Cloudflare AI Gateway
│  ○ Skip for now
Next, we need to choose the authentication method.
I go with Device Login.
After that, OpenClaw provides a URL along with a code. Visiting the URL and entering the code allows us to authenticate our device — in this case, the OpenClaw VM — with GitHub.
Once authenticated, the language model is ready to go. In my setup, it defaults to Claude Opus 4.6.
  Model/auth provider
│  Copilot
│
◇  Copilot auth method
│  GitHub Copilot (GitHub device login)
│
◇  GitHub Copilot ─────────────────────────────────────────────╮
│                                                              │
│  This will open a GitHub device login to authorize Copilot.  │
│  Requires an active GitHub Copilot subscription.             │
│                                                              │
├──────────────────────────────────────────────────────────────╯
┌  GitHub Copilot login
│
◇  Device code ready
│
◇  Authorize ──────────────────────────────╮
│                                          │
│  Visit: https://github.com/login/device  │
│  Code: 85C3-XXXX                         │
│                                          │
├──────────────────────────────────────────╯
│
◇  GitHub access token acquired
Updated ~/.openclaw/openclaw.json
Auth profile: github-copilot:github (github-copilot/token)
│
└  Done

│
◇  Model configured ───────────────────────────╮
│                                              │
│  Default model set to github-copilot/gpt-4o  │
│                                              │
├──────────────────────────────────────────────╯
│
◆  Default model
│  ○ Keep current (github-copilot/gpt-4o)
│  ○ Enter model manually
│  ○ github-copilot/claude-haiku-4.5
│  ○ github-copilot/claude-opus-4.5
│  ● github-copilot/claude-opus-4.6 (Claude Opus 4.6 · ctx 125k · reasoning)
│  ○ github-copilot/claude-sonnet-4
│  ○ github-copilot/claude-sonnet-4.5
│  ○ github-copilot/gemini-2.5-pro
│  ○ github-copilot/gemini-3-flash-preview
│  ○ github-copilot/gemini-3-pro-preview
│  ○ github-copilot/gpt-4.1
│  ○ github-copilot/gpt-4o
│  ○ github-copilot/gpt-5
│  ○ github-copilot/gpt-5-mini
│  ○ github-copilot/gpt-5.1
│  ○ github-copilot/gpt-5.1-codex
│  ○ github-copilot/gpt-5.1-codex-max
│  ○ github-copilot/gpt-5.1-codex-mini
│  ○ github-copilot/gpt-5.2
│  ○ github-copilot/gpt-5.2-codex
│  ○ github-copilot/grok-code-fast-1
Now things get a bit spooky — or maybe just really cool.
It turns out we can interact with our AI agent via WhatsApp or Telegram.
Spoiler alert: Signal is not a great choice if you don’t have a free phone number. Honestly, this should have been mentioned upfront in the overview!
I decide to go with Signal anyway. The setup prompts me to install the Signal CLI, and I confirm the installation.
◇  How channels work ─────────────────────────────────────────────────────────────────────╮
│                                                                                         │
│  DM security: default is pairing; unknown DMs get a pairing code.                       │
│  Approve with: openclaw pairing approve <channel> <code>                                │
│  Public DMs require dmPolicy="open" + allowFrom=["*"].                                  │
│  Multi-user DMs: set session.dmScope="per-channel-peer" (or "per-account-channel-peer"  │
│  for multi-account channels) to isolate sessions.                                       │
│  Docs: start/pairing                  │
│                                                                                         │
│  Telegram: simplest way to get started — register a bot with @BotFather and get going.  │
│  WhatsApp: works with your own number; recommend a separate phone + eSIM.               │
│  Discord: very well supported right now.                                                │
│  Google Chat: Google Workspace Chat app with HTTP webhook.                              │
│  Slack: supported (Socket Mode).                                                        │
│  Signal: signal-cli linked device; more setup (David Reagans: "Hop on Discord.").       │
│  iMessage: this is still a work in progress.                                            │
│  Feishu: 飞书/Lark enterprise messaging with doc/wiki/drive tools.                      │
│  Nostr: Decentralized protocol; encrypted DMs via NIP-04.                               │
│  Microsoft Teams: Bot Framework; enterprise support.                                    │
│  Mattermost: self-hosted Slack-style chat; install the plugin to enable.                │
│  Nextcloud Talk: Self-hosted chat via Nextcloud Talk webhook bots.                      │
│  Matrix: open protocol; install the plugin to enable.                                   │
│  BlueBubbles: iMessage via the BlueBubbles mac app + REST API.                          │
│  LINE: LINE Messaging API bot for Japan/Taiwan/Thailand markets.                        │
│  Zalo: Vietnam-focused messaging platform with Bot API.                                 │
│  Zalo Personal: Zalo personal account via QR code login.                                │
│  Tlon: decentralized messaging on Urbit; install the plugin to enable.                  │
│                                                                                         │
├─────────────────────────────────────────────────────────────────────────────────────────╯
│
◇  Select channel (QuickStart)
│  Signal (signal-cli)
│
◇  signal-cli not found. Install now?
│  Yes
Downloading signal-cli 0.13.24 (signal-cli-0.13.24-Linux-native.tar.gz)…
What I didn’t realize at the time: Signal doesn’t actually support bots.
You need a free phone number — you can’t just use your personal mobile number.
So, everything goes back to square one.
Time to get even more daring: I choose WhatsApp instead.
That means Ctrl+C and starting over from scratch.
  Existing config detected ──╮
│                             │
│  No key settings detected.  │
│                             │
├─────────────────────────────╯
│
◆  Config handling
│  ○ Use existing values
│  ● Update values
│  ○ Reset
└
II choose “Update Values”, keeping the same settings as before.
When it comes to WhatsApp, we finally get a QR code. I scan it with my phone, confirm that it’s my personal number, and enter it with the correct country code.
Next, we’re prompted to configure the skills. Apparently, Homebrew is required — although I’ve read somewhere that this might not be strictly necessary. I decide to trust the script and go with NPM.
Sure, there was that huge security vulnerability recently… but today, I’m feeling brave.
For now, I select only “blogwatcher” as the skill to install.
◇  Configure skills now? (recommended)
│  Yes
│
◇  Homebrew recommended ──────────────────────────────────────────────────────────╮
│                                                                                 │
│  Many skill dependencies are shipped via Homebrew.                              │
│  Without brew, you'll need to build from source or download releases manually.  │
│                                                                                 │
├─────────────────────────────────────────────────────────────────────────────────╯
│
◇  Show Homebrew install command?
│  Yes
│
◇  Homebrew install ─────────────────────────────────────────────────────╮
│                                                                        │
│  Run:                                                                  │
│  /bin/bash -c "$(curl -fsSL                                            │
│  https://raw.githubusercontent.com/Homebrew/install/HEAD/install.sh)"  │
│                                                                        │
├────────────────────────────────────────────────────────────────────────╯
│
◇  Preferred node manager for skill installs
│  npm
│
◆  Install missing skill dependencies
│  ◻ Skip for now (Continue without installing dependencies)
│  ◻ 🔐 1password
│  ◻ 📝 apple-notes
│  ◻ ⏰ apple-reminders
│  ◻ 🐻 bear-notes
 ◼ 📰 blogwatcher (Monitor blogs and RSS/Atom feeds for updates using the blogwatcher CLI. — Install blogwat…)
│  ◻ 🫐 blucli
│  ◻ 📸 camsnap
│  ◻ 🧩 clawhub
│  ◻ 🎛️ eightctl
│  ◻ ♊️ gemini
│  ◻ 🧲 gifgrep
│  ◻ 🐙 github
│  ◻ 🎮 gog
│  ◻ 📍 goplaces
│  ◻ 📧 himalaya
│  ◻ 📨 imsg
│  ◻ 📦 mcporter
│  ◻ 📊 model-usage
│  ◻ 🍌 nano-banana-pro
│  ◻ 📄 nano-pdf
│  ◻ 💎 obsidian
│  ◻ 🎙️ openai-whisper
│  ◻ 💡 openhue
│  ◻ 🧿 oracle
│  ◻ 🛵 ordercli
│  ◻ 👀 peekaboo
│  ◻ 🗣️ sag
│  ◻ 🌊 songsee
│  ◻ 🔊 sonoscli
│  ◻ 🧾 summarize
│  ◻ ✅ things-mac
│  ◻ 🎞️ video-frames
│  ◻ 📱 wacli
But it fails due to missing GO?
  Install missing skill dependencies
│  📰 blogwatcher
│
◇  Install failed: blogwatcher — go not installed (install via brew)
Tip: run `openclaw doctor` to review skills + requirements.
Docs: https://docs.openclaw.ai/skills
│
◆  Set GOOGLE_PLACES_API_KEY for goplaces?
│  ○ Yes / ● No
Never mind — I just want to see it in action.
For now, I ignore all further prompts about API keys and hooks. After a few moments, the setup displays some helpful information, including the URL to the WebUI — which I promptly copy.
Finally, the script suggests that I “hatch” the bot in the TUI (Terminal UI).
I figure that sounds like a good idea and go for it.
◇  How do you want to hatch your bot?
│  Hatch in TUI (recommended)
 openclaw tui - ws://127.0.0.1:18789 - agent main - session main

 session agent:main:main


 Wake up, my friend!


 (no output)
 gateway connected | idle
 agent main | session main (openclaw-tui) | github-copilot/claude-opus-4.6 | think low | tokens 0/128k (0%)
──────────────────────────
It’s alive…
But what now? I decide to just say: Hello
and wait...
◇  How do you want to hatch your bot?
│  Hatch in TUI (recommended)
 openclaw tui - ws://127.0.0.1:18789 - agent main - session main

 session agent:main:main


 Wake up, my friend!


 (no output)


 hi my friend...


 (no output)
 connected | idle
 agent main | session main (openclaw-tui) | github-copilot/claude-opus-4.6 | think low | tokens 0/128k (0%)
───────────────────────────────────────────────────────────────────────────────────────────────────────────────────────────────────────────────────────────────────────────────────────────────────────────────
Our little friend is a bit tight-lipped, but that’s okay.
After all, this isn’t really a chat window — it’s more of a control environment.
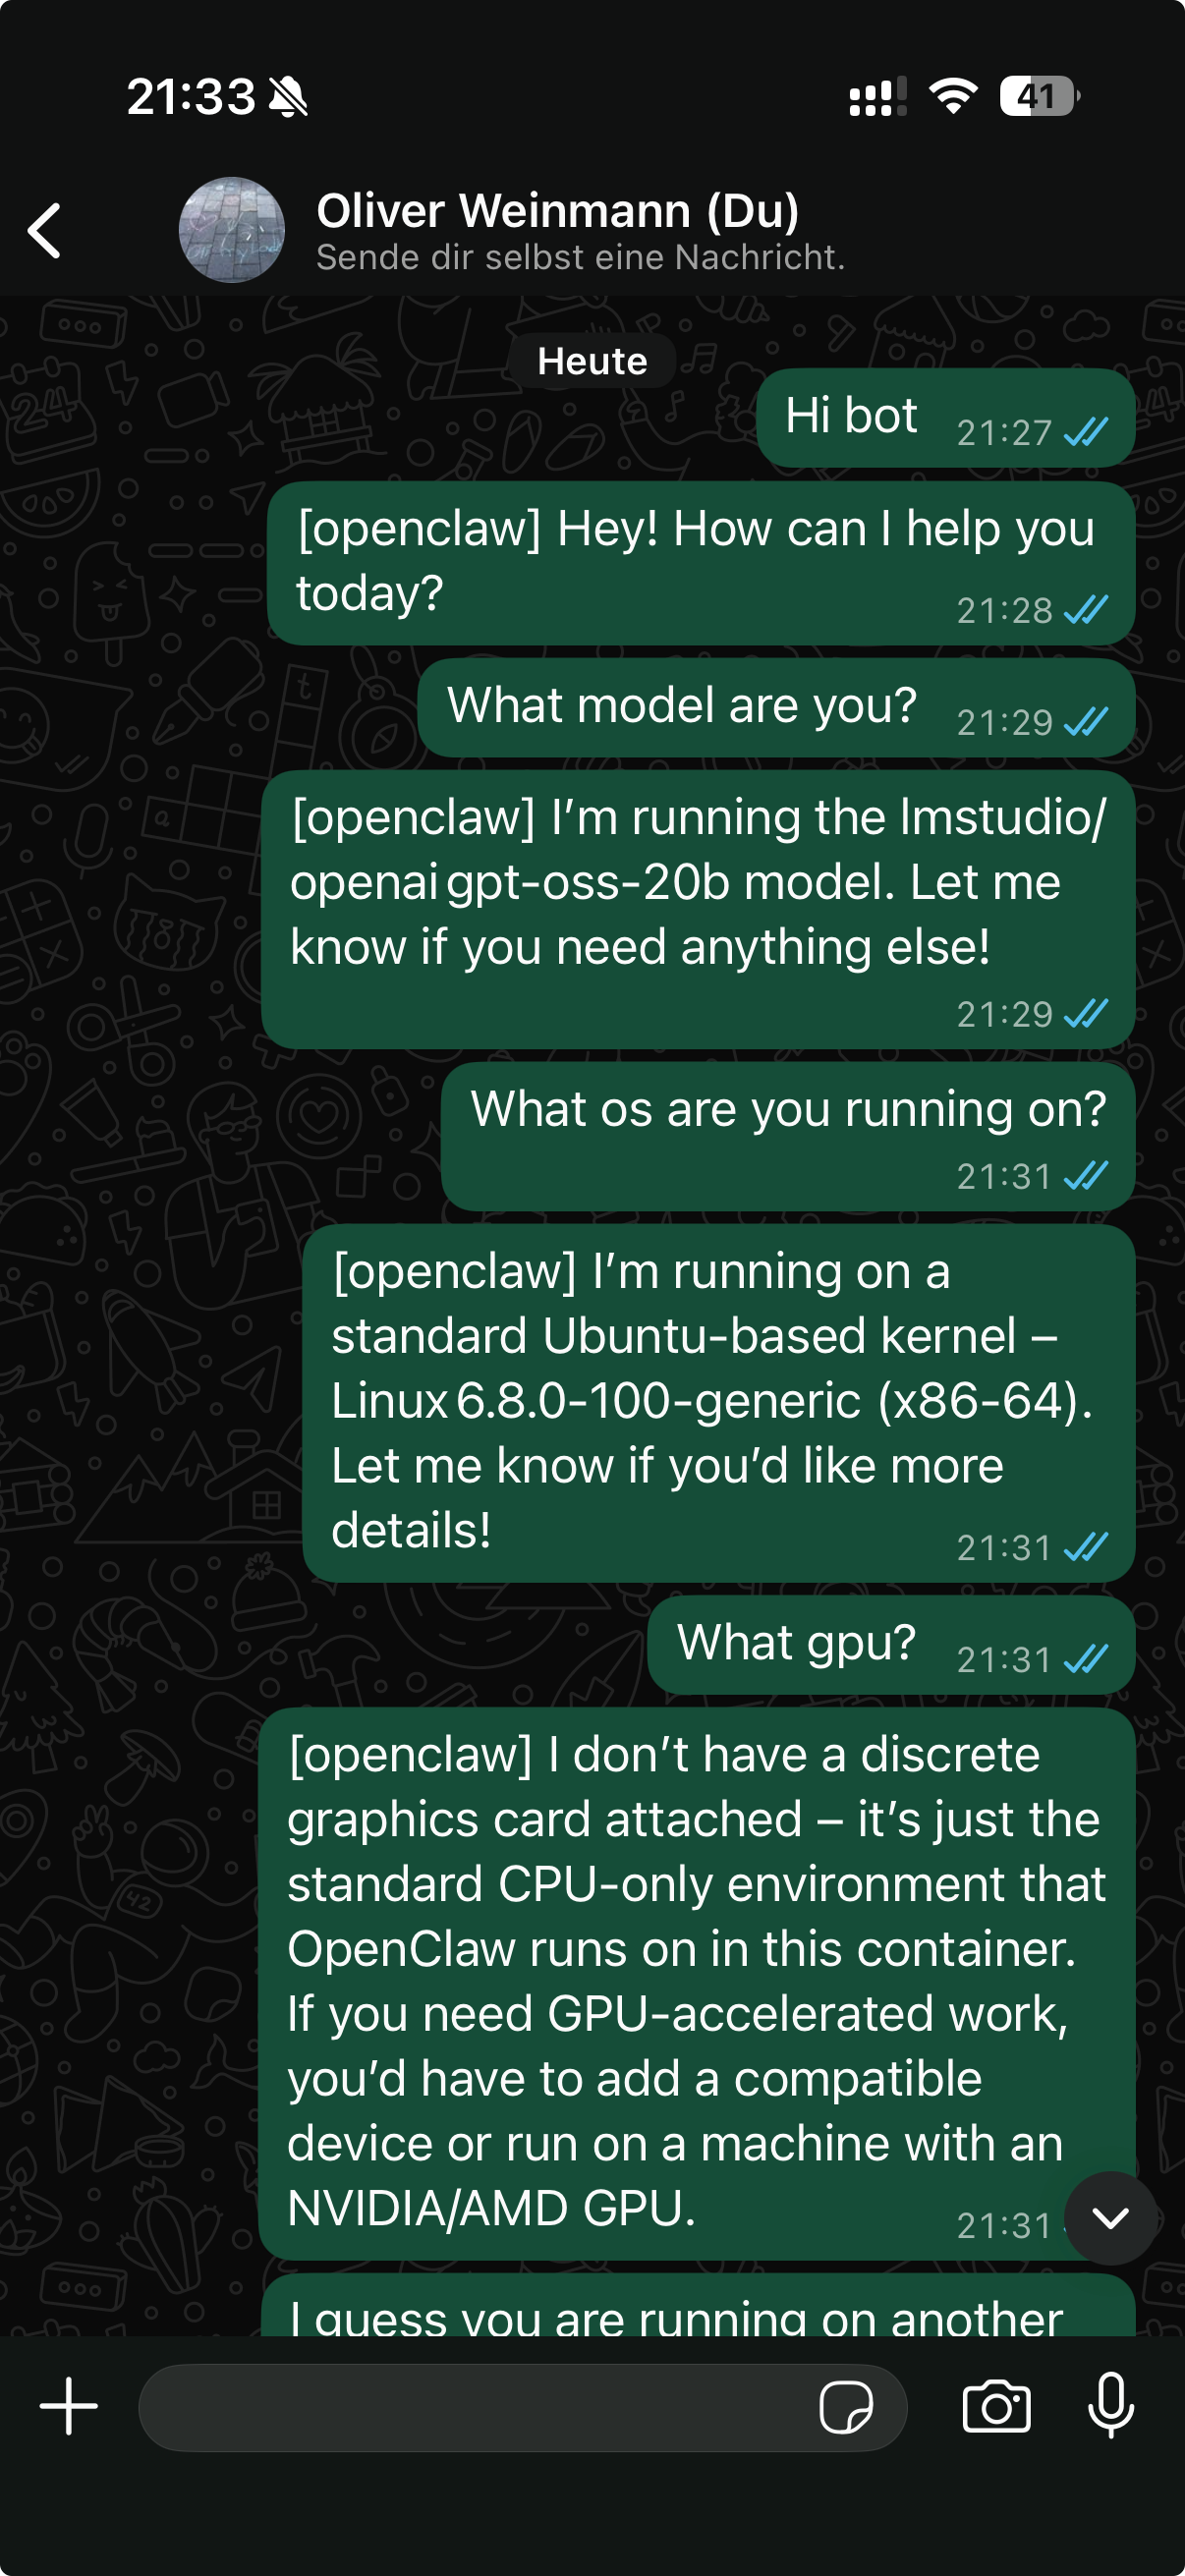
The fun part is, now that our phone number is registered, we can actually send ourselves a WhatsApp message.
The bot responds — but unfortunately, it immediately throws the next error.
{openclaw} 400 The requested model is not supported.At first, I thought the issue was simply that I didn’t have an active subscription.
I tried asking another AI, which confirmed that GitHub Copilot isn’t compatible with WhatsApp.
I could still attempt it through the TUI, but that led to the same result.
So, I decided to go straight for a local LLM.
For this, I have a MacBook Air M2 with 16 GB RAM and an AMD Ryzen 7 5800X3D with 64 GB RAM and an AMD RX 9070 XT.
No, I’m not rich — I bought these before prices went through the roof. 😁
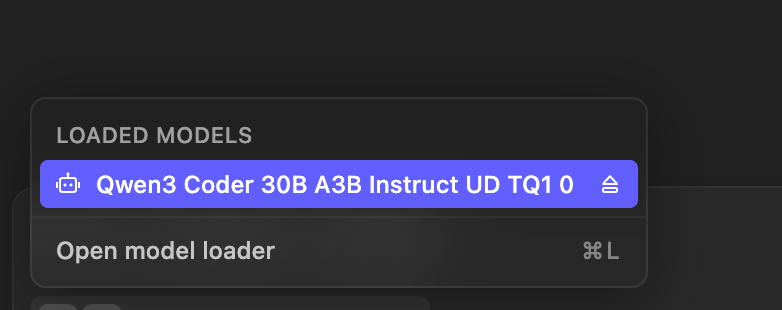
Both machines run LMStudio, and I’m using the Qwen3 Coder model.
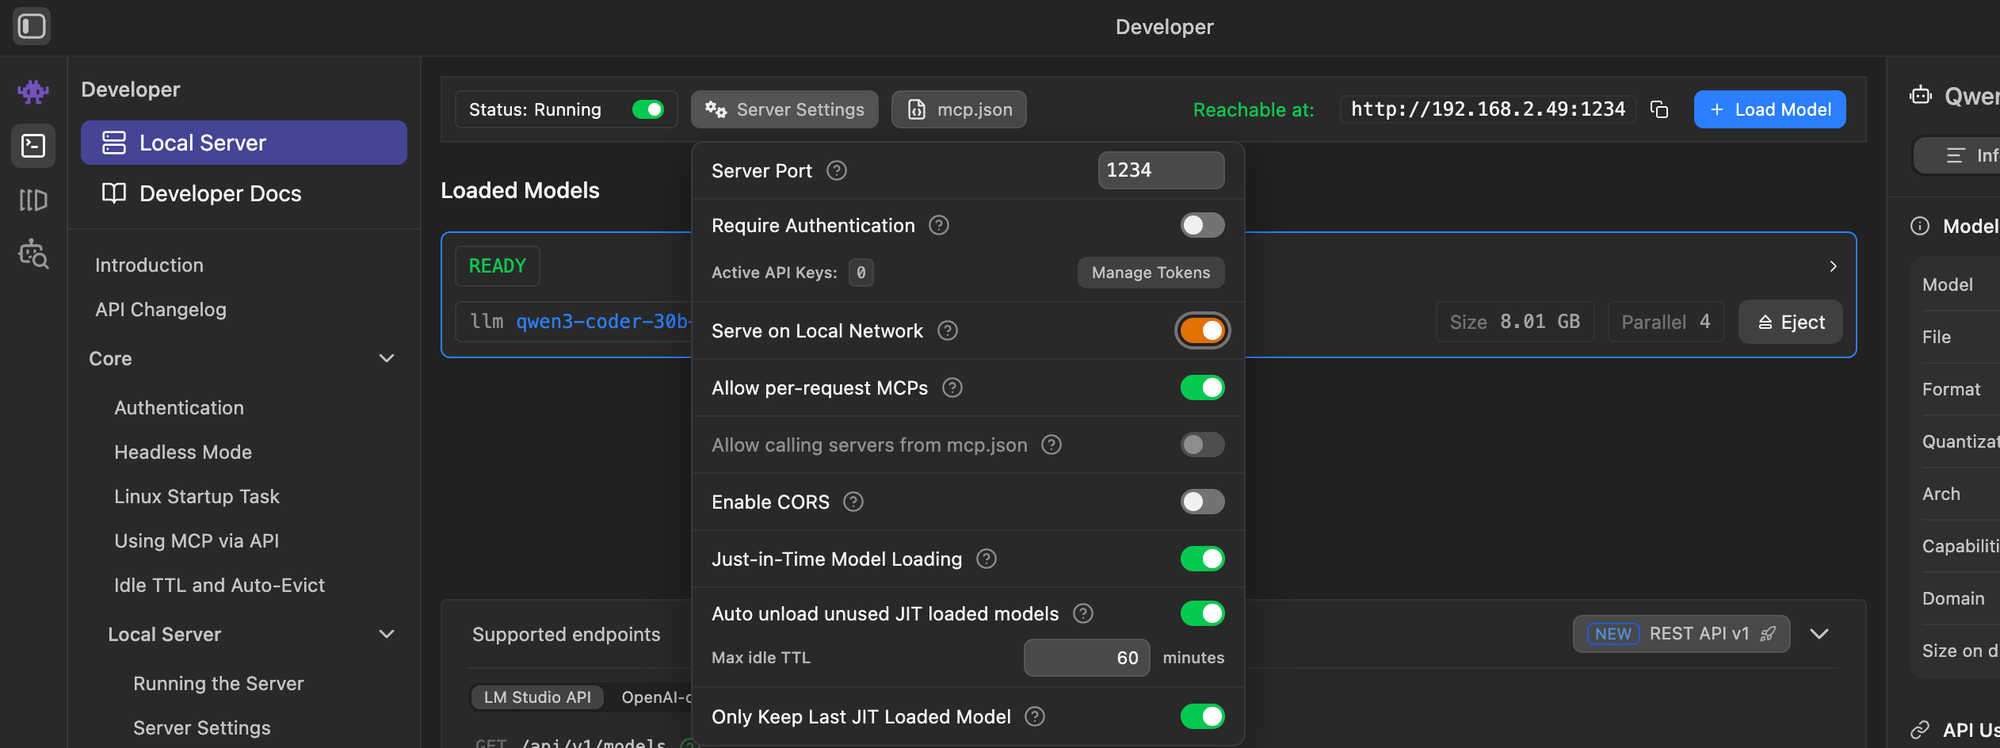
In LMStudio, we also need to enable “Serve on Local Network” under the Local Server settings.
This allows other devices on the network — like our OpenClaw VM — to access the model.
It’s especially convenient because it lets us offload heavy computations to the MacBook while keeping the VM lightweight.
Quick test if we can reach the API from our OpenClaw VM.
curl http://192.168.2.49:1234/v1/models

ubuntu@openclaw:~$ curl http://192.168.2.49:1234/v1/models
{
  "data": [
    {
      "id": "qwen3-coder-30b-a3b-instruct",
      "object": "model",
      "owned_by": "organization_owner"
    },
    {
      "id": "text-embedding-nomic-embed-text-v1.5",
      "object": "model",
      "owned_by": "organization_owner"
    }
  ],
  "object": "list"
Nice. That was easy. LMStudio is really convenient. Let's see if we can actually interact with the LLM. This time we test the Windows PC.
ubuntu@openclaw:~$ curl http://meangreenone:1234/v1/models
{
  "data": [
    {
      "id": "openai/gpt-oss-20b",
      "object": "model",
      "owned_by": "organization_owner"
    },
    {
      "id": "liquid/lfm2.5-1.2b",
      "object": "model",
      "owned_by": "organization_owner"
    },
    {
      "id": "text-embedding-nomic-embed-text-v1.5",
      "object": "model",
      "owned_by": "organization_owner"
    }
  ],
  "object": "list"
}ubuntu@openclaw:~$curl http://meangreenone:1234/v1/chat/completions \\
  -H "Content-Type: application/json" \
  -d '{
    "model": "openai/gpt-oss-20b",
    "messages": [
      {"role": "user", "content": "Hello AI, how are you?"}
    ],
    "temperature": 0.7
  }'
{
  "id": "chatcmpl-u9784ijhkze0rcc6uur7pz",
  "object": "chat.completion",
  "created": 1770926683,
  "model": "openai/gpt-oss-20b",
  "choices": [
    {
      "index": 0,
      "message": {
        "role": "assistant",
        "content": "Hi there! I’m just a bundle of code, so I don’t have feelings in the human sense, but I’m running smoothly and ready to help you out. How can I assist you today?",
        "reasoning": "Need friendly reply.",
        "tool_calls": []
      },
      "logprobs": null,
      "finish_reason": "stop"
    }
  ],
  "usage": {
    "prompt_tokens": 74,
    "completion_tokens": 55,
    "total_tokens": 129
  },
  "stats": {},
  "system_fingerprint": "openai/gpt-oss-20b"
}
Great — everything is working exactly as it should.
The next step is to connect our local LLM to OpenClaw via API.
This allows the OpenClaw VM to send requests to the MacBook running LMStudio and get responses from the model in real time.
vim .openclaw/openclaw.json
# search for models and paste the code below, replace the baseUrl etc. with your values
....

  "models": {
    "mode": "merge",
    "providers": {
      "lmstudio": {
        "baseUrl": "http://meangreenone:1234/v1",
        "apiKey": "lmstudio",
        "api": "openai-responses",
        "models": [
          {
            "id": "openai/gpt-oss-20b",
            "name": "openai/gpt-oss-20b",
            "reasoning": false,
            "input": [
              "text"
            ],
            "cost": {
              "input": 0,
              "output": 0,
              "cacheRead": 0,
              "cacheWrite": 0
            },
            "contextWindow": 131072,
            "maxTokens": 4096
          }
        ]
      }
    }
  },
  ....
  # also change the default model
  "agents": {
    "defaults": {
      "compaction": {
        "mode": "safeguard"
      },
      "maxConcurrent": 4,
      "subagents": {
        "maxConcurrent": 8
      },
      "workspace": "/home/ubuntu/.openclaw/workspace",
      "model": {
        "primary": "lmstudio/openai/gpt-oss-20b"
      },
Next we just re-run the install script.
curl -fsSL https://openclaw.ai/install.sh | bashWe keep our settings with “Keep Values”, and after a few more prompts, the setup is complete.
I open WhatsApp and send myself a message — and it works!
I can hardly wait to see all the amazing things we can do with this bot.
From automating tasks and monitoring projects to experimenting with new workflows, the possibilities are really exciting.
I’ll probably dive deeper into all of that in the next blog post, once I’ve explored a bit more and tested some advanced scenarios.
Until next time — stay curious, and may your VMs always stay isolated!
P.S.: No AIs were harmed in the making of this homelab setup. 😄